Archive for the ‘Mesa Boogie Dual Rectifier’ Category

EQ Schematic

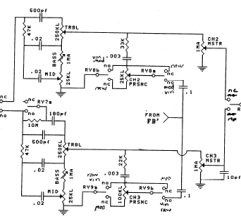
Schematic of tone stacks for Channel 2 and 3.  Note the Presence control circuit and the value differences for its resistors

When Modern Mode is selected on Channel 3 of a Dual Rectifier, an additional capacitor is added to the circuit.  This changes the capacitance value from 500 pf to 680 pf.  By doing this, it moves the frequency from which the treble swings on axis from 1.27 kHz down to 936 Hz.

The effect of this change is twofold: 1) The upper mids receive a greater emphasis in the sound; 2) The overlap of range between the Mid control and the Treble control forces the Mid frequencies to move up in dB, effectively giving a mid-boost throughout the range of the Mid control.  The change also prevents the Mid control from being as scooped at the minimum setting by about a maximum of 2 dB between 600 Hz and 800 Hz.

(more…)

Wow.  After most of one year devoted to my favorite amplifier, I don’t have a regular topic to cover, now.  Toward the end of 2015, my health declined pretty dramatically.  I ended the Dual Rectifier analysis early, because it was taking too long to put the articles together.  Aside from helping people understand the amp or tweak it, my intention was to assist DIY circuit designers, by highlighting interactions between the preamp stages and the key changes Mesa made to the basic design as established by Marshall and Soldano.

Since this version is now obsolete, I felt there would be little harm in sharing an analysis.  I haven’t done this for people to copy the design in whole.  Since the schematic is available in dozens of places, that could already be done by anyone who would want to.  I want people who are making their own amplifiers to see what this example does and decide if anything from it should, or should not, be a part of their own design, or if a modified form could be used.

When my health became even worse than it already was, I was stopped dead in my tracks.  By the time I could sit at the computer again, the inspiration was waning; not by lack of my want to write it out, but by the effects of the disorders I have to contend with.  It’s a very difficult hobby and I don’t want to make mistakes if I’m trying to help others.

Left Undone

I had not originally planned to write about the power amp, but some of it was relevant to analyzing the preamp modes.  I put that into the “Overview” article, but there is more that could be said.  I’m not sure I’m going to be able to do it.  In particular, the negative feedback could use a more detailed analysis to determine exactly how much stability is being added.

The other thing is the power supply.  The effects from combinations of different settings of the power and rectifiers would help with understanding the compression and headroom designed into the stages.  In fact, with only a very quick look, I noticed that V1 and V2 are probably more compressed and act like a limiter compared to tubes upstream, but it would need an analysis to be sure of that and also the extent of it.

So….

I’ve had a request to analyze the Mesa Boogie Mark V.  I might analyze select parts of it.  At this time, I don’t have the energy to go into massive detail and I don’t own a Mark to test the results.  I could post it as “just hypothesis”.

If I run into my own problems or cool, quirky tones, I’ll post about solutions or tweaks.  I also have one my old pedal designs to tinker with and some DIY ideas to look through, but I am not able to be in a hurry with any of it.
I wanted to give my deepest gratitude to all of the people who have visited this blog in 2015.  My statistics for visits and engagement aren’t massive (and I don’t expect that), but they exceeded my goal by more than 200% and my total page views were more than a 4000% increase over 2014.

In particular, the members of the Mesa community at The Boogie Board have provided inspiration, feedback, questions, critique, and support that helped shape the way information was presented in regard to the articles about the Dual Rectifier.  Thank you, very much.

As well, a handful of people from the Music Electronics Forum visited to check my work and I am incredibly grateful for the time and feedback from those who helped.

I hope everyone has an awesome 2016.  Cheers.

Where We’ve Been

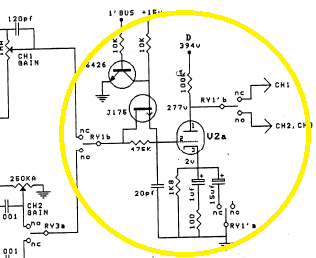
So far, we’ve looked at the input stage and Clean mode, and the voicing and Gain controls for Channels 2 and 3.  When we left off, the signal had been filtered, dropped down, filtered again, and was exiting the Gain pot by way of a 475 k grid resistor into Stage 2 (V2a).

Grid Resistor

V2aDRAside from controlling incoming current, the grid resistor serves to adjust the highest frequency allowed to enter the amplification stage by creating a filter due to the tube’s internal capacitance (around 1.6 pf).  Additionally, this stage has a 20 pf capacitor in parallel to the tube.  This increases the total capacitance to 21.6 pf. (more…)

Here’s an example of the way I’m setting my amp lately.  It utilizes what I’ve learned about the Clean circuit, FX Send, Solo, and other things.   (more…)

Tonight, I tried some different setups between my Recto and a Line 6 Pod X3 Live.  I was trying to get a good headphone mix for silent playing.  The “Slave Out” was making noise and I switched to using a send from my Nova System to the X3.  I found the similarities between the modes to be quite minimal.  It was striking, really. (more…)

I already covered the input stage and clean channel.  I’m not going to repeat the information about the input, except for applications to the dirty tones.

The input stage is followed by a coupling cap and a 2.2 M load resistor in parallel with the voicing circuit and gain pot.  Most amps made prior to the Recto place the grid resistor between the coupling cap and the load.  The load is usually a potentiometer to control gain.  I think Mesa made this change to better enable the changes to the voicing circuit which control the load and blocking resistances. (more…)

This is in regards to the Presence circuits for a 3 Channel Dual/Triple Rectifier and the Roadster/Road King.  I do not have information on the Reborn or miniature versions, though I suspect they kept it pretty much the same.

Mesa came up with a clever Presence circuit for the 2001 3 Channel Rectos, which carried over to the Road King and Roadster on their relative channels.  For the sake of flexibility, the Presence pot is flanked by relays to swap the function between modes.  The modes are used to determine power amp response due to negative feedback and the amount of distortion it is capable of producing.  From most to least: Modern, Vintage, and then Raw.

Using Modern, the negative feedback is disconnected and treble frequencies are being attenuated by an RC filter connected between the the Presence pot and the wiper of the Treble pot.  Using Vintage, negative feedback is being fed from the transformer to the PI.  The amount of feedback is controlled by the Presence pot, which also sets the frequency cutoff; it has dual functions as a resistor divider and a filter.   Raw is a special case and is discussed on its own below.  I will be using Channel 2 for the examples, but I will contrast the circuit differences with channel 3. (more…)

Since I’ve been utilizing the FX Send function for tone, I wanted to add it to the form I use for settings.  Here’s a copy for you.
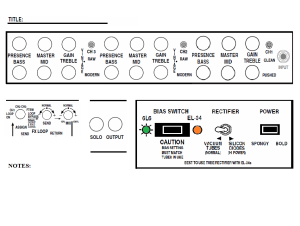
Dual Rectifier Settings

Edit: Since writing this post, I’ve found increasing the Send to be more effective when the bias is colder.  Tubes in the lower range will make the amp run warmer and improves the sound without adjusting the Send.

In the manual, Mesa recommends bypassing the loop to get the best tone for recording or other situations where the fidelity is needed (isn’t that always?).  The loop works by cutting down the signal to send it out (like a volume control) and then re-amplifying it when it comes back in through the Return.  This is great for inserting effects, but people often struggle with the tone, because it’s always going through those amplification stages when engaged.  I found an effective way to get a better sound with the FX loop engaged. (more…)